Monday, November 5, 2012

Countdown to Thanksgiving

Started working on my Thanksgiving job out at the Ranch today. I feel like I am behind because Thanksgiving falls so early this year and because some of the guests are showing up earlier than usual. All the behind the scenes prep work happens now...the work that makes Thanksgiving week run smoothly. Pie crusts get made and frozen, the homemade meat sauce for Saturday evening Lasagna simmers for hours and I make the Orange Cranberry Sauce. Well, that was really all I got done today because I also did two and a half hours worth of shopping, the first trip of many spent filling multiple carts at our local grocery. I really encourage you to try this Cranberry Sauce. Not only is it incredibly easy, but it keeps forever-really months-and takes no time at all. I could eat it by the spoonful (and I do!).
Ingredients: 2 cups sugar, 2 cups water, 1 large navel orange (organic, please), 2-1# bags of fresh cranberries and a few grinds of nutmeg.
Here's the recipe:
Wash the orange and cut it into quarters, then cut each quarter into 3 or 4 pieces. Cut off the "navel" and the small part at the stem end. Toss the chunks (yes, peel and all) in a food processor along with one bag of the cranberries and process it until the orange is in small pieces. This takes about 20-30 seconds in my food processor. In a saucepan, place the sugar and the water and turn the heat to medium high. Stir a few times to help the sugar dissolve then dump in the contents of the food processor and the other bag of whole cranberries.
Cook this until it comes to a boil, stirring every now and then. Then lower the heat to medium low and let it simmer for about 20-30 minutes, stirring occasionally. It will get thicker and a bit jelly like.
As it cools, it thickens even more. Remove from heat and let it cool for about 15 minutes and then grate about 1/4 teaspoon of nutmeg and stir to mix. Let it cool completely and put the sauce in a covered container and refrigerate. It will last for at least 3 months. Nothing better on a post Thanksgiving turkey sandwich! But it's also pretty darn good on vanilla ice cream...
Come visit me on Saturday mornings at the Farmers Market at the Cibolo in Boerne. I sell my breads and assorted other goodies. Winter hours are 9-1. Hope to see you there!


Thursday, August 9, 2012

"Quick" 3 Ingredient Jam

It has been EXACTLY 5 months since I have posted anything here.  FIVE. MONTHS. Unbelievable! I started traveling for work the end of March and finished up the middle of May. I was home less than 2 weeks total in that time and, I've got to say, it ate my lunch. The traveling was great...Augusta, Georgia was lush and green; Seoul, South Korea was stunning and incredibly clean for a city of over 10 million people (not to mention some of the best food I've ever eaten); Kaiserslautern, Germany was like "old home week" and more fun than work should be (Thanks Rebecca!!) and Fayetteville, North Carolina was a nice finish to it all. Still, I marvel at folks who travel all the times for their jobs. I never fully unpacked in those two months, just washed clothes when I was home and packed them right back up. The experiences were enriching, the work fascinating, but home suffered, the garden almost unrecognizable by the time late May rolled around. After I reintroduced myself to my family (hey! remember me?), I started trying to fall back into the farm schedule while playing catch up with everything else. On top of it all, I was out at the ranch cooking 10+ days in June. Eventually the garden got planted, the house got pulled together a bit more and I got back to work on projects I have going on.
Lots of Spring rains led to a very dry Summer. We put in new water catchment tanks in the midst of all the traveling and they were soon full to overflowing. Thank goodness as I need it now to keep things alive. The fig tree took forever to put on figs and then, BAM, they began ripening faster than we could eat them! They are big and really tasty, maybe the best ever (I wonder if I say that every year). So out comes the stock pot and I make jam. I am a lazy jam maker, never using pectin or additives...just fruit, lemon juice and honey. And enough water to keep it from scorching. Here's how I do it.
Rinse your fruit well and then cut in large chunks. Place in a stock pot and add enough water to reach about halfway up the fruit. I used 8 cups halved figs and 2 1/2 cups water.
Add the juice of a lemon (about 3-4 Tablespoons) and turn the heat to medium. Begin to mash the fruit lightly to break it up.
Cook for a few hours, mashing the fruit up every now and then. It will get thicker as some of the water cooks off. It should have a slow bubble going on. Not really a full simmer, but some movement in the pot. I check on it every 30 minutes or so and give it a good stir, mashing up any larger pieces I see.
After it cooks down-today it was about 3 hours-I use my wand blender to make it smooth.
I don't know what I would do without a wand blender. I use it almost every day. I have a number of them that I use for different purposes. It is invaluable for making soap as it mixes the ingredients much better than I could by hand and brings the soap mixture to trace so very quickly (but that's another post, isn't it?).
If you want smooth jam, I can't imagine another tool so easy to use. You could always dump the hot fruit mixture into your blender and whiz it smooth, but that seems like more work and mess than I am up for (I told you I am a LAZY jam maker!).
Once it was smooth, I let it cook down even more...about 30 minutes for this batch. It spit and bubbled and I stirred it more frequently now. I was in the kitchen setting up the pot of water for the water bath and getting my jars and lids together. When it looked ready-not super runny and it would mound up on a spoon-I added the honey. For this batch, I used 1 1/4 cups of raw honey. You have to stir pretty consistently for a few minutes to incorporate it well. The color gets a bit darker. I don't cook it much beyond this as I don't want to negate the benefits of using raw honey.
I ladle the jam into clean jars and screw the lids on and place them in a pot of boiling water. When all the jars are in the pot, the water should be at least two inches above the lids. I cover the pot and keep it on a fast simmer (or slow boil) for 15 minutes. Then I remove the jars (with a jar lifter...a real handy kitchen tool if you can frequently) and place them on a clean kitchen towel to cool. They ping! as the jars cool and the lids suck in.
I've used this same recipe for peaches, plums, strawberries and it worked great for each.
This is my second batch of fig jam this month. I love using it for jam bars in the Fall. Shortbread crust with a thick layer of jam on top and then shortbread crumbs on top of the jam. Love. Maybe I'll get to post the recipe for jam bars sometime soon or maybe I'll wait until Fall...
And of course it is wonderful on toast, Scott's favorite use for it.

Have fun and SMILE!

Friday, March 9, 2012

Real Creamed Spinach. Really!

I can't say I ever ate creamed spinach as a kid. Or really as an adult. It just always seemed somehow...creepy...to me. I love spinach-in salads and sauteed with garlic-but creamed? Blech! When I began my cooking job at the ranch, the freezer was stocked with quite a few boxes of Green Giant Creamed Spinach. I used them and bought more and now it is common to have it on the table there-especially at Thanksgiving. I tried it once and it wasn't terrible (not quite an endorsement, huh?), but I still preferred spinach sauteed with garlic. Until now. My garden is full of spinach and I've been looking for different ways to use it. Last week a recipe showed up by email and after some fiddling around it has become my very favorite use of spinach. So much so that we've eaten it twice in 2 days and the recipe that supposedly serves 4, leaves Scott and I wanting more. Here's how I make it:
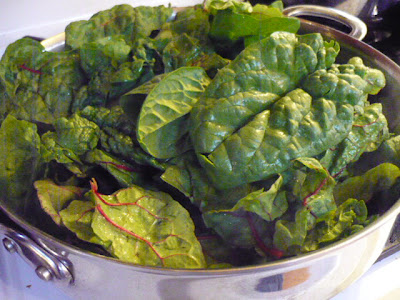
Pick 12 cups of spinach (about 12 ounces)-or buy a 12 ounce bag of spinach-and remove the stems. I used all spinach the first time I made it, but today I used a mixture of spinach and chard.
Melt 1 Tablespoon of butter in a large skillet over medium heat and add the greens. You can dump them in all at once if your skillet will hold them or wilt them in 2 batches.
Cook just until wilted and then transfer to a colander placed in the sink to drain.
Take 2 large peeled shallots and slice them thin.
Melt 1 Tablespoon of butter in the skillet and saute the shallots over medium heat until they are soft.

Add a 1/4 teaspoon of salt and then pour in 1/3 cup of white wine. I use a St. Gen Sauvignon Blanc-Texas made, inexpensive and a perfectly good cooking wine.

Increase the heat to medium high and cook until the wine is all but evaporated. This only takes a minute or two. There will be a thin sheen of liquid in the pan, but not enough to puddle.
Lower heat to medium again and add 1/3 cup of heavy cream. Stir until the cream thickens a bit, another minute or so.
Add 1/2 teaspoon of salt, 2 or 3 grinds of pepper and some freshly grated nutmeg.
Throw the drained spinach back into the skillet and toss it around to mix thoroughly with the cream mixture.

Sprinkle with 2 Tablespoons grated Parmesan or Emmenthaler cheese and serve!

Here's the recipe (adapted from a recipe from Fine Cooking):
Creamed Spinach with Shallots


2 Tablespoons unsalted butter
12 oz. spinach (about 12 loosely packed cups)
2 medium shallots thinly sliced
1/3 cup white wine
1/3 cup heavy cream
Kosher salt
Freshly ground black pepper
Freshly grated nutmeg
2 Tablespoons freshly grated Parmesan or Emmenthaler cheese

Melt 1 Tbs. of the butter in a large skillet over medium heat. Add the spinach and cook just until wilted, about 2 minutes (you can do this in 2 batches if your skillet won't hold it all). Transfer to a colander in the sink.
Melt the remaining tablespoon butter over medium heat and then add the shallots. Cook until softened but not browned, about 5 minutes. Add the wine, raise the heat to medium high, and cook until almost evaporated, about 2 minutes. Lower heat back to medium and add the cream. Simmer until it’s thickened, about 1-2 minutes. Season with 1/2 tsp. salt, 3 grinds of pepper, and the nutmeg. Stir in the spinach and toss it around to mix thoroughly with the cream mixture. Top with the cheese and serve!  
Makes 2 generous servings

Saturday, March 3, 2012

Homemade Almond Paste and The Garden Revisited

I love almonds. And I love anything made with them. Almond cake, almond cookies, almond paste. I make quite a few recipes that use almond paste and there have been times when our local grocery was out, as was my pantry. And really, a 7 ounce tube runs close to $6 and something in me (the cheapskate) cringed everytime I bought one. I've been making a new recipe that I so love. I think it is one of the best desserts I've ever eaten. It is called a Pithivier (pronounced P-T-V-A) and it is an almond dessert extraordinnaire! I saw it in Paris called a Galette des Rois,(click on this link for the most beautiful Pithivier I've ever seen. It was made by Tamami, a friend and fellow baker in London) but I believe at different times of the year, it is called different names (gotta' love the Parisians). The dessert consists of a puff pastry top and bottom filled with the most exquisite almond filling. An entire tube of almond paste goes into the filling. I've made a few of them and they are not inexpensive to make-especially because of the $6 tube of almond paste in the filling (we won't talk about the massive amounts of butter). So I went on a search for a better source for almond paste than my local grocery. I got the price down to about $4.85 for 7 ounces. But that still seemed crazy, I mean it is almonds and sugar, more or less. Well MORE I found out, but totally manageable to make at home with pretty simple ingredients. I made almost 4 pounds of almond paste from scratch this morning in less than 30 minutes. And it's good-I mean it's "cut off slices and snack on them all day" kinda' good. The ingredients:
Blanched almond flour, sugar, honey and almond extract. I forgot to put the sugar in the photograph. I found the almond flour online through a company called Honeyville. If you sign up for emails from then, you receive discount emails. Mostly 10% off. I bought 5 pounds of blanched almond flour for just over $30 including shipping. This is enough to make over 20 tubes (7 ounces each) of almond paste. Here's my recipe:

ALMOND PASTE

1 cup plus 3 Tablespoons sugar (250 grams)
1/4 cup honey
7 Tablespoons (a scant half cup) water
3 cups plus 3 Tablespoons blanched almond flour (500 grams)
1 1/2 teaspoon almond extract
about 2 teaspoons soft butter

Place the sugar, honey and water in a saucepan, mix well with a whisk and bring to a hard boil. Place the almond flour in the food processor. Remove the boiling sugar water mixture from the heat and, with the food processor running, slowly pour over the almond flour. Blend until smooth. Add the almond extract and blend again for another minute. You may have to scrape down the sides and push the paste around as it is quite stiff. Dump out onto your counter and grease your hands with the butter. Remember the almond paste will be fairly hot! Knead the almond paste until smooth and cooler-about 5 minutes.
Divide into ounces needed and wrap and store in the freezer. Makes 4-7 ounce "tubes" plus about 3-4 ounces more.
I know these measurements seem odd, but in my kitchen I weigh out ingredients, and usually in grams. My kitchen scale gets used most every day.
I noticed on the label of commercial almond paste there is no almond extract listed. Upon further research I discovered that a particular type of almond is used for almond paste-similar to bitter almonds. Very strong almond taste. I just added almond extract (also made from a variety of bitter almonds) to make up for using regular old almonds. So now my freezer is full of individual packages of homemade almond paste. I see Pithiviers in my future...

I read on Wunderground (weather underground...you mean you don't have a few different weather sites you check each day...really?) that rainfall amounts in Central Texas from December 2011 through February 2012 were in the top 10 since the late 1800's. I measured 12 full inches (my neighbor disputes this, but I think I get a bit extra each time it rains just 'cuz I'm a weather geek). My garden could feed a small country. Look at these pics compared to last month...
Native hollyhocks on the right, poppies and cilantro on the left.
Artichokes in the background, lettuces and chard in front.

Two different sugar molds with lettuces.I have started picking the outer leaves.
Mustard in bloom. The bees have been loving these tiny yellow flowers.
 Lily and I have been taking forays into the woods looking for morels. Even though we didn't have much cold this winter it was quite wet, so I'm hoping we'll have a small crop.

Nothing yet, but it is a few weeks early. It's just been so nice and warm, I thought they might pop out of the ground in response. We'll start hunting in earnest in a week or so, but for now it is nice to take walks with her. 
Enjoy these last few weeks of winter!

Friday, February 10, 2012

Texas Gardening-Expect the Unexpected!

For all my years of gardening in Texas, I've maintained that the garden looks picture perfect for about 15 minutes sometime in early April. Well, this year it looks like it may be early February or maybe the 15 minutes will stretch into a few months! After last years weather -blistering hot temps day after day for months and no rain at all- this year has been a gift. Over 5 inches of rain in December, 2.5 in January and here we are the first week in February and I've already registered just under 2 inches. Amazing and nothing short of magnificent as far as the garden is concerned! I can't keep up with all the greens: 5 kinds of lettuce, mustard spinach, regular spinach, 2 kinds of kale, chard, broccoli raab, beet greens, cilantro and arugula. The cauliflower and broccoli are putting out nice fat heads along with scrumptious leaves. The sugar snap peas that just pushed out of the ground a week and a half ago are growing at record speed. Flowers that haven't been in the garden for years -poppies, larkspur, native hollyhocks- have shown up and are growing like they're on steroids. It's all incredibly encouraging. And a good life lesson for me...sometimes things just need to sit in the soil and wait for the perfect opportunity to burst forth. As good as our intentions may be, if the conditions aren't right, our seeds (and dreams) will not come to fruition. Patience, patience, patience. Not my strong point.
A native hollyhock flanked by cilantro and oregano.
Poppies are everywhere...in the beds, in the paths and between cracks in boards. What a riot of color the garden will be in another month!
A bed of mixed greens: broccoli raab, arugula, romaine
Sugar snap peas ready to climb the lampshade frames. I've used this technique the last two years and it worked great. No sense reinventing the wheel...
I have a few of these old Mexican sugar molds (ever seen piloncillo -Mexican cone sugar-at the grocery store? It used to be formed in molds like these-maybe still is...). I used them to hold up the ends of a bed. This year, I filled them with soil and seeded them with just a few seeds of various kinds of lettuce. I've thinned them down to one or two seedlings per hole. Since lettuce have a fairly small root system, I think each hole will hold one head of lettuce. These pics were taken a week ago. The lettuce is doing real well so far. I'm hoping the storm due this evening doesn't bring hail!
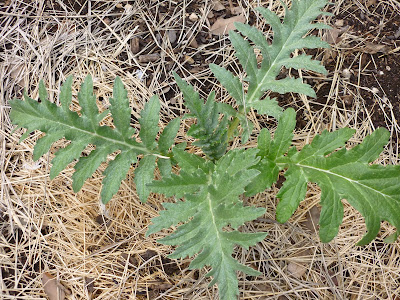
This is a cardoon. It is an interesting Mediterranean vegetable. You pick the leaves -they get very large- and strip off the leafy part so all that remains is the stalk. You then cook and eat the stalk. Very tasty. However, it looks VERY much like an artichoke (below)...they are related, but different.
You can see small differences in the two...slightly more rounded ends on the leaves of the artichoke and the area surrounding the stalk is also wider. But I put them far apart in the garden so I wouldn't get them mixed up. Artichokes are perennials and you'll have them in the garden for many years if you (and the weather) treat them right. My last batch of artichoke plants bit the dust last year when I struggled to keep ANYTHING alive in the garden. I planted 3 new plants this year.
A bed of mixed lettuces, although mostly Romaine. My aversion to neat rows -or maybe just orderliness in general- is apparent here, but it works for me. I scatter seed and as they come up I pick whole plants for salads to create more room. As they get  bigger, I leave the plant in the soil and just snip off outer leaves to eat.
And of course, cauliflower and broccoli. The weather has been warmer than they like, so some worm is nibbling the cauliflower. But their appetites (or stomachs) are small, so they leave pretty good sized heads for us. The leaves are great shredded and sauteed in olive oil with lots of garlic or added to soups.
I am ever hopeful that this wet winter we've been experiencing will result in some morel mushrooms. It would help if it was a bit colder, but I can't help but think the moisture will result in a crop this year.
Happy Gardening in 2012!